Call Toolbar
![]()
The Call Toolbar is a user interface that can be docked to the top or bottom of the desktop display and provides quick access to many core features including call handling, call preview information and call centre tools.
Note: The Call Toolbar feature availability will vary by both HIPIN and Telephone system user and license type:
Standard features are available with BASIS, STANDAARD and PREMIUM user license
Example of standard user Call Toolbar:
![]()
Call Center features are only available with the PREMIUM user license and Telephone system Call Centre features:
Example of Telephone system Call Centre and PREMIUM user:

To dock the toolbar, move the bar to the top or bottom of the screen using the "drag" area, then select "dock":

Select "dock" again to reset the toolbar position, if required.
Features
CRM Integration
The left-hand window of the toolbar displays call preview information including CRM integrated caller details plus target extension / group / queue name.

Contact popping and Activity logging can also be triggered from within the window via the presented icons, if available with Add Contact displayed if the contact record is not found in all available address books.
Call Control and Actions
The following actions and controls are available from the Preview Window when a call is in progress but depending on the device in use and the address book or business CRM integrations available:
|
|
Answer Deflect |
When a call is ringing, you can choose to answer the call by clicking the "Answer" button or deflecting it (transfer it without answering it) to another extension. |
|
|
Hang Up | End the call |
|
|
Hold/Resume | Pause/Resume the call - the caller will hear hold music if available |
|
|
Consult | Place the current call on hold and transfer the call to another extension |
|
|
Transfer | Blind transfer to another extension without introduction |
|
|
Complete Transfer | Connect the original call to the transfer destination recipient and disconnect |
|
|
Cancel Transfer | Cancel the call to the transfer recipient and return to the original call |
|
|
Call Pickup | Answer call ringing at another member of your pickup group |
|
|
Send Digits | Softphone only: send DTMF during connected call |
|
|
Show Contact | Shows the full contact details, obtained from the Netsapiens directory |
|
|
Add contact | Add the caller to the shared address book or integrated CRM business applications |
|
|
Open/Pop Contact | Open the full contact details within an integrated CRM business application. The icon shown will relate to the CRM application (e.g. Google, Salesforce). |
|
|
Create and Show Call Task | Creates and opens a call activity (call log) in an integrated CRM business application. The icon shown will relate to the CRM application (e.g. Salesforce, Dynamics) and also the type of entry: Contact, Account or Lead. |
Note: The hold button is not utilized for transferring calls.
Answer and Deflect
An incoming call can be answered or deflected, depending on the device type in use.
![]()
Click the "Answer" button to connect the incoming call to your preferred device:
![]()
Click the "Deflect" button to enter the destination to redirect the call to without answering:
![]()
After the Deflect button is clicked, the destination entry box appears.

Enter the extension name or number to deflect the call and then click the deflect button:
![]()
Or to cancel the deflection:
![]()
Hold and Hangup
A connected call can be held, transferred or disconnected, depending on the device type in use.
![]()
Click the "Pause" button to place the current connected call on hold:
![]()
(caller hears hold music if enabled in telephone system).
Click the "Play" button to retrieve the held call:
![]()
Click the "Hangup" button to end the call and disconnect the other party:
![]()
Transfer
Calls can be transferred with either a "consult" introduction to the transfer target destination, or "blind" without any introduction.
Blind Transfer
To transfer the call without an introduction, click the "Transfer" button:
![]()
Enter the transfer target telephone number into the dial entry box
![]()
Click the "confirm" button to transfer the call to the target recipient:
![]()
Or click the cancel button to return to the call without transferring:
![]()
Consult Transfer
To transfer the call with an introduction, click the "Consult" button:
![]()
Enter the transfer target telephone number into the dial entry box
![]()
Click the "confirm" button to place the current call on hold and call the target recipient:
![]()
Or click the cancel button to return to the call without transferring:
![]()
The Call Toolbar now shows the transfer destination with left and right arrow buttons to switch between the two connected calls if required (this does not switch the call between the connected parties, only the display window).
![]()
Click the "Complete transfer" button to connect the two parties and disconnect from the call:
![]()
Or click the "Cancel transfer" button to disconnect the outbound call and return to the original call without transferring:
![]()
Outgoing Calls
Click the Make Call button to begin an outgoing call then click to confirm the number and begin dialing.
![]()
Alternatively, the Telephone system user list can be searched by name if you wish to call a co-worker.

Once answered and "Connected", the Call Toolbar will offer call handling buttons, dependent on the device used to make the outgoing call.
![]()
The display window shows the same information for both inbound and outbound calls. The information and icons displayed will depend on whether the telephone number is already found within any address books or integrated CRM applications and which device is used to make the outgoing call.
Note: The outgoing call process will vary with the preferred device type selected – a "dialback" may need to be answered first by the selected device before the outgoing call is made.
Show Contact
![]()
"Show Contact" will open the contact within the integrated CRM application or address book.
If the contact is found in the telephone system directory, a HIPIN window is displayed with action buttons:
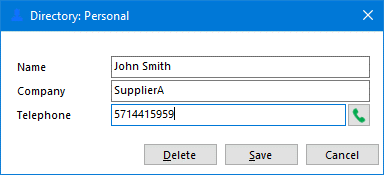
Dial the selected telephone number:
![]()
If the contact is found in the user's Personal directory, the option to Edit/Save or Delete is also presented.
If the contact is found in Cloud Contacts, a HIPIN window is displayed with action buttons and the option to Edit/Save or Delete is also presented.
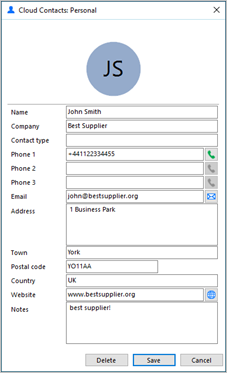
Dial the selected telephone number:
![]()
Open default email client to send email:
![]()
Open default web browser to visit web page:
![]()
Add contact
When the Call Toolbar displays a call that is not yet found in any integrated address book (or is found in some but not all integrated address books) the Add Contact icon is displayed. This offers a quick method to insert the contact details into multiple locations.
![]()
Entry not found in any address book:
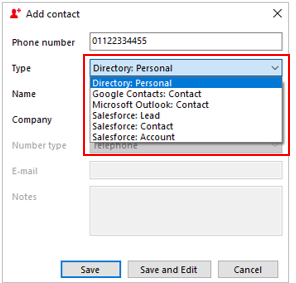
Entry found in all address books except PPL:
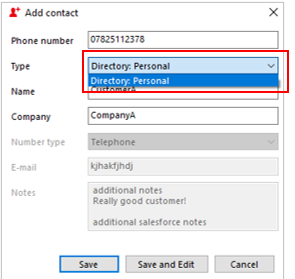
Select which integrated address book "Type" to add the contact into and either "Save" or "Save and Edit" to also open the contact within the selected address book. The stored details are then used to add to the next selected address book "Type" to quickly duplicate the contact record into multiple locations.
Related topic: Call Centre.

 Report this page